
Design inspiration and small home renovation ideas
If you’re interested in small home renovation ideas and how to get design inspiration to elevate your basic-looking home then this post is for you!
In this article, I will walk you through a personal renovation project in Southern California a few years ago that is an example of how simple changes can transform a builder-grade house into a stylish home.
You might be thinking: “Dia, how can I use renovation ideas from 2009 for design inspiration in 2023?” Well, design trends come and go but when you make upgrades based on inspiration from key unchanging factors then your renovation will stand the test of time.
And remember, interior design just like fashion trends is cyclical, so quite often what was a trend a while ago comes back in style a few years later with just a few variations. Dare I mention bell bottoms that are popping up in stores lately?
Let’s first talk about the scope of this project:
Small home renovation ideas – focus on what will make the biggest impact
This moderately sized 1600 sq ft – 2 bedroom / 2.5 bath, townhome was a property that my husband and I bought in late 2008 for our personal use. It was in fairly good condition but we knew that some aspects of the home needed major overhaul and others just needed to be enhanced.
We had visions of updating the kitchen, bathrooms, elevating the overall style and making the small outdoor space more inviting. Oh, and we also needed to furnish and decorate the entire house because our previous house had been sold with all the furnishing included!
We had lots of small home renovation ideas but there was only so much we could do within the timeframe and the tight budget we had planned for this project.,
So the strategy was to allocate funds where they would make the greatest impact and use creative ways of elevating the look and function of the space. I came up with a plan to enhance the spaces by using existing elements that were in good condition, increase function through built-ins, and find cost-effective ways of decorating the entire space without breaking the bank. To help stretch the budget we planned to outsource the more complex tasks to contractors and do the rest of the work ourselves.
So let’s jump into what inspired the design and renovation of this small townhouse and what we did to upgrade it.

Photo by Nick George on Unsplash
I often say that you can get inspiration from many things. It can be a painting that you love, a rug, a textile, or even memories of a place or the feeling that a favorite location evokes in you. These can be the basis for creating a color palette and design you love.
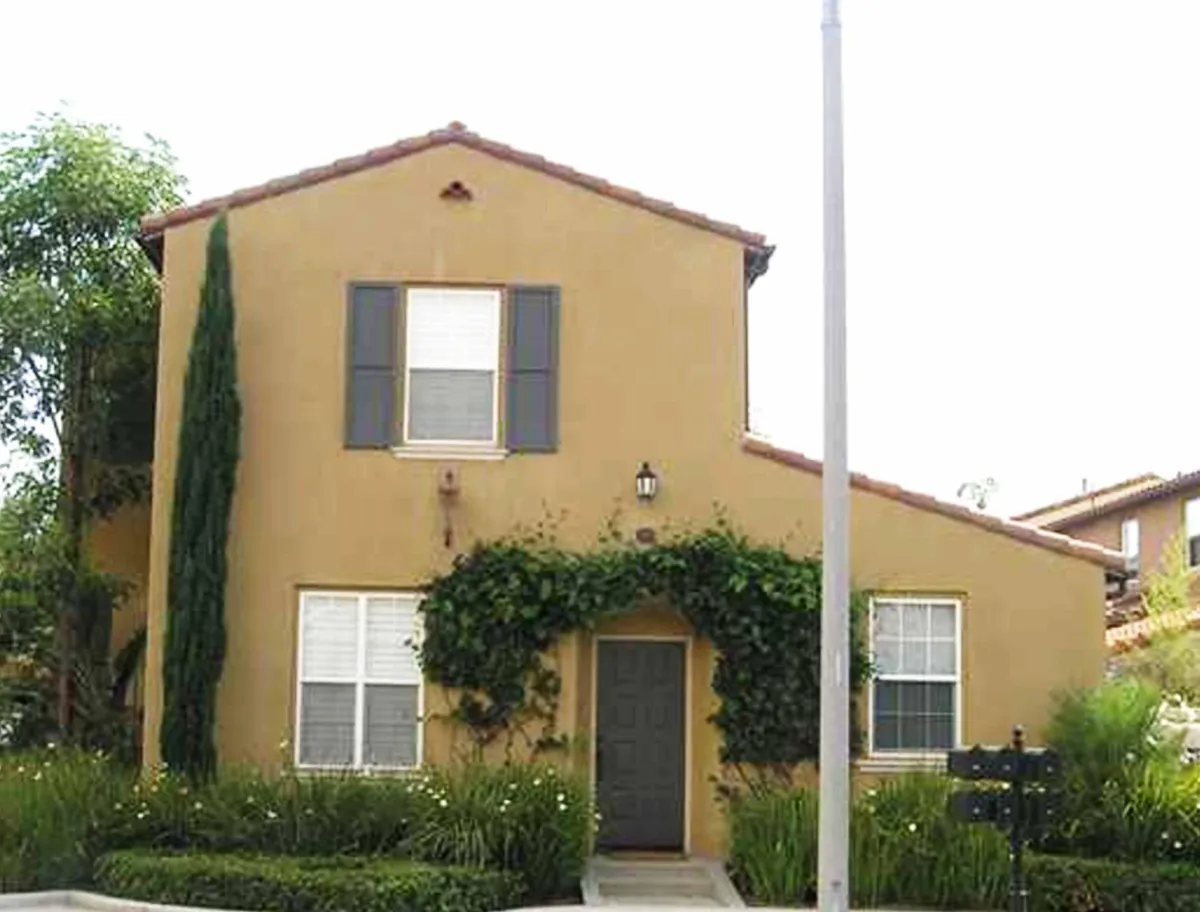
We have spent many years in the Mediterranean and love the warm texture and architecture of traditional homes of that region. We especially like the tall cypress trees and natural landscape. The exterior design of this house with its warm color theme, shutters, and terracotta tile roof, made it look like a small Tuscan house which drew us to it in the first place.
So, it was only natural that the home’s exterior style and sunny southern California location be the foundation of the interior design inspiration and the overall color palette.
But wait, there was another key element to my inspiration. At the time we had an adorable pet whose coat had all our favorite colors of tan, black and light beige!

Photo by At Home With Dia ©
Who said you can’t draw design inspiration from the colors of a beloved pet?
Small home renovation ideas to elevate the look of a home
Level up the home’s overall style
Below is a photo of what the home’s interior looked like when we bought it.

Builder grade looking interiors – Photo by At Home With Dia ©
As you can see the home came with very basic builder-grade material and had little to no style.
Despite the drab look of the interior, we could see that it had good bones and a lot of potential. So, we embarked on a mission to elevate the overall look of the cozy floor plan and lean into the Tuscan style without going too theme-like.
The first order of work was to install crown molding and 5-inch baseboards throughout the ground level and paint all the rooms a neutral creamy beige to replace the jaundiced-looking color on the walls. In my quest to find a color that was just right, I created a custom paint color by mixing taupe and pale beige for a soothing, creamy, but slightly warm beige. I painted 3 coats of the mixture on a piece of white cardboard and took it to the Sherwin Williams store to have it color-matched. They were happy to accommodate us and prepared multiple gallons of paint for us. We named the color “Dia’s creamy latte”. 😁
A fresh coat of soft white paint addressed the dingy-looking doors, trim, and ceiling for a brighter look.
Drawing design inspiration from wrought iron metal, common in the Tuscan region, the faux nickel door hardware was replaced with oil rubbed bronze handles and the white kitchen cabinet knobs were switched out with matching cabinet pulls.

Photo by At Home With Dia ©
Getting design inspiration from existing elements
As mentioned before, the budget for this project was moderate compared to all that we wanted to accomplish. So, I looked at existing materials that could be kept and drew colors from these elements to expand our design.
Fortunately, the home had existing 24”x 24” ceramic tiles in a soft neutral color, set in a diamond pattern throughout the lower level. The tiles were in very good condition even though they looked grimy. This was an excellent cost-saving opportunity. So after all the major renovation work was completed we steam-cleaned and sealed the tile floor and grout. This simple process not only saved a huge chunk of the budget, but restored the floors to their former glory and made cleaning them a whole lot easier.
The tile floor color and pattern were also another key design inspiration element for many of the color decisions that were made throughout the home.
Pro-tip: When budget is tight, be strategic with reno choices
We had considered replacing the staircase carpet and upper-level, orange-colored laminate flooring with engineered hardwood. But we had to make some compromises. Since the laminate plank flooring was in very good condition, we decided to live with the color and just camouflage it with neutral rugs in the bedrooms. On the stairs, we installed a neutral-colored, stain-resistant carpet to keep noise to a minimum when our puppy dog ran up and down the stairs.
The kitchen cabinets were also in great shape but the dated white square tiles on the counters and backsplash left a lot to be desired and screamed ‘builder basic’.

Kitchen before – Photo by At Home With Dia ©
Small home renovation ideas – Simple kitchen updates for big impact
Using the flooring color as a guide and taking inspiration from the natural stone in Tuscan homes, we adapted that look by using travertine tiles on the backsplash and dark counters for some contrast to mimic the rich soil of the Tuscan landscape.
We sealed the travertine backsplash to make it super easy to keep clean as we didn’t want our Italian-inspired cooking ingredients to stain the surface.

Photo by At Home With Dia ©
The kitchen got a facelift with new quartz countertops and travertine backsplash, set in a diamond pattern that mimics the flooring. Stainless steel undermount sink, new faucet, undermount dish soap dispenser, oil rubbed bronze cabinet knobs, and stainless steel appliances elevated the overall look of the space.
Design inspiration – Make common areas welcoming and comfortable

Entryway set up – Photo by At Home With Dia ©
Make the entryway an introduction to the home’s decorating style
The home’s entrance focal wall got a complementary accent color to welcome visitors and act as a prelude to the home’s overall color scheme.
Even though the space was quite small, a demilune console fit perfectly without obstructing traffic flow from the kitchen to the living room. A small painting of a Tuscan landscape set the tone for the home’s decorating aesthetic.

Small living room – Photo by At Home With Dia ©
Be strategic with furniture options and placement
As empty nesters, we liked the small footprint of the home. As we say, “less to clean when the house is small!” 😉
I kept in mind the design inspiration and color scheme, and I was very selective about what furniture was brought into the space. To avoid making the cozy living room look cramped, furniture selection and placement were carefully considered. The room has windows on two walls. The obvious place for the TV was on the only uninterrupted wall across from one of the windows. We placed a compact sofa and chaise combination across from the TV. The low profile of the sofa avoided blocking natural light from the window but provided ample seating for 2-3 people. The storage bench also offered extra ad hoc seating and was a great place for storing things to keep the room looking tidy.
I deliberately kept the furniture to a minimum because we wanted our puppy dog to be able to move freely around the space without worrying about a coffee table being in his way. We placed a side table on one side of the sofa and a small storage trunk on the other side for a convenient spot to place a coffee cup or a book.
Pro-tip: When budget is tight, consider consignment or vintage stores
To furnish the house, I scoured local consignment and second-hand stores. I was able to find some high-end quality pieces in excellent condition at a fraction of the cost of buying brand new.

Dining space – Photo by At Home With Dia ©
Design inspiration for easy flow
The small dining area off the kitchen and stairway, also acts as a way to get to the outdoor patio. Placing a large table would have made going in and out challenging.
An expandable round table was a perfect fit for the space without obstructing traffic flow. The table was kept closed with four chairs on normal days, but could expand into an oval shape to accommodate an additional two or more chairs for when we had guests over for dinner. One of the extra chairs was placed in a corner of the primary bedroom and the second one was used in the upstairs loft area.
Now let’s go upstairs where some major changes occurred…

Upstair built-in workspace – Photo by At Home With Dia ©
Design inspiration for maximizing every inch of available space
The home had an area at the top of the stairs leading to the two bedrooms with ensuite bathrooms. The space was over six feet wide with a pony wall. This valuable square footage was begging to be utilized. We built in a custom counter and a stock cabinet that matched the kitchen cabinets to create a workstation. The clean lines of the counter allowed ample space to spread out paperwork and the cabinet housed a printer and a spot to store files and supplies.
Now let’s look at the spaces that required some demo but in a scaled-back way.
Small home renovation ideas – enhancing blah-looking and challenging spaces
This home had two good-sized bedrooms with ensuite bathrooms that were unappealing and challenging.

Primary bathroom before – Photo by At Home With Dia ©
The primary room’s vanity counter was discolored and the inside of the cabinet looked like it had sustained water damage. The shower had a discolored fiberglass surround, the floor was cheap linoleum and the shower doors were rickety and moldy. To top it all off, the toilet was so close to the door that you had to step past it, touching the shower enclosure to be able to close the bathroom door.

Primary bathroom before – Photo by At Home With Dia ©
Makes you wonder why on earth do architects design bathrooms like that?! 🤨
I considered the option of removing the wall between the vanity area and the shower/toilet space and installing a door between the bedroom and vanity space. However, that would have required structural work, plus more time and money than the project timeline and budget allowed.
Small home renovation ideas – if the budget is limited, work with the existing configuration
Instead of embarking on a budget-buster renovation in the bathroom, I worked with the existing footprint and got creative in improving function and looks.

Primary bathroom after – Photo by At Home With Dia ©
The shower tile installation brings a bit of the tile floor diamond shape into this space.
We installed a new elegant vanity with a quartz countertop and plenty of drawers to maximize organized storage. We also replace the builder-grade light fixture and mirror with new stylish options.
Additionally, we installed a new tile that closely matched the color of the main level flooring on the floor, the shower pan, and the shower walls in a diamond pattern to create a cohesive look and make the space feel slightly more spacious than its actual size.
Door handles, shower fixtures, and faucet were switched out to oil rubbed bronze to match the rest of the house. Two key changes that improved function were the new smaller toilet and installing a pocket door between the vanity and bath area. So, no more squeezing by the toilet to close the door 🙂.
Next up was the other ensuite bathroom which had a similar configuration but a different issue.
At first glance, the secondary bathroom looked to be in good condition with what appeared to be a newer soaker tub. Of course, the fiberglass tub surround downgraded the look of the space but something more concerning was lurking underneath the surface.
Small home renovation ideas – if something appears weird, investigate

2nd bathroom before – Photo by At Home With Dia ©
Initially, we were not planning to make any major changes to this bathroom other than to replace the linoleum flooring, the mirror, the faucet, and possibly the vanity countertop.
But once we moved in and decided to take a leisurely soak in the tub, something didn’t feel right. The tub made a strange noise when you stood in it.
On further inspection, I discovered what appeared to be a drywall patch that was a result of a water leak in the garage directly below the bathroom. We then went through the paperwork received during escrow and discovered that the previous owners had disclosed there was a hole in the original tub which forced them to replace it.
So, if the tub was new, what was making that noise and why did the tub feel like it was moving?
Drastic measures are sometimes necessary
To investigate further, we had to remove the fiberglass surround. That is when we discovered that the tub had not been secured into the wall studs properly!
It was a fairly simple fix, but since the fiberglass tub surround was already off the walls, we decided to give this space a facelift to elevate its look even further.

2nd bathroom after – Photo by At Home With Dia ©
We used the same tile and materials for the second bathroom as we did in the primary bathroom. This created a cohesive and elegant look. We set the floor and bath surround tile in a diamond shape, which continued the pattern repetition, tying in the upstairs and downstairs design scheme. And while we were at it, we switched out the toilet to a smaller one to make going in and out of the space a bit easier. And of course, we gave the vanity area a mini facelift.
Small home renovation ideas – don’t overlook storage opportunities
When we bought the house, I noticed that this small townhome had a very generous double garage.
I’m always a believer that if you can find space to create organized storage solutions, do it! So we allocated a very small portion of the budget to install simple storage cabinets along one wall, so we could store off-season items, tools, and other things not accessed regularly.

Garage storage – Photo by At Home With Dia ©
The above solution provided valuable storage behind closed doors, leaving ample space for two cars to easily park side by side, and helped to maintain the interior spaces of the home, clutter-free. Also, adding 2 large, shop light fixtures, was a bonus for when I needed extra light to work on my DIY and upcycling projects.
During the rest of the renovation, we also worked on the home’s outdoor space which is visible from the kitchen and dining areas.
As I always say, “if you don’t have a view, create one!” The goal was to create a beautiful view from the inside and also provide us with an outdoor space we could use year-round.
Small home renovation ideas – make your outdoor space as beautiful and usable as the inside.
This townhome’s outdoor space was very small but I didn’t let that hinder the plans to make it a comfortable and charming area where we could enjoy the mild California weather and nature.
Stamped concrete patio floor, raised beds and a pergola were the foundation of what would become our favorite space to hang out.

Patio hardscape – Photo by At Home With Dia ©
The next step was to layer in the pretty stuff, which included a Tuscan-inspired fountain and lots of lush greenery.

Patio green scape – Photo by At Home With Dia ©
Creeping fig vines were planted as a background to soften the hard angles of the stucco wall, then multiple Liriope in front of the vines. We also planted some sweet-smelling annuals in the foreground completed the look.
Now we were able to enjoy our Tuscan-inspired home, all because of simple design inspiration and a budget-wise, stylish renovation.

Photos by At Home With Dia ©
We loved every single space we transformed. However, during the 2.5 years that we owned this home, the outdoor patio was the spot we enjoyed the most. We sat there with our doggy in the mornings and evenings, sipping our favorite beverage, or having a meal. It was a pleasure taking in the beautiful aroma of blooming flowers and listening to the soothing sound of trickling water from the fountain.
Key takeaways from this small home renovation:
Get design inspiration from things you love.
Use existing elements for design and color inspiration.
Focus on updates that will make the biggest impact.
Repeat color, material, and pattern in various areas for a cohesive look.
If the budget is limited, work with the existing configuration and materials.
Maximize every inch of available space and don’t overlook storage opportunities.
If you don’t have a view, create one and make your outdoor space as beautiful as the inside.
This project is an example of how simple changes, a cohesive color scheme, and allocating funds to where it makes the greatest impact, will transform and elevate the overall look of your home.
I hope these small home renovation ideas inspired you to look at budget-friendly ways of improving your spaces.
If you liked this article, feel free to share a comment below. I would love to hear what design inspiration stood out the most to you.
If you're currently planning your next home decorating project, these additional resources may help inspire your space:
